Showing posts with label how to. Show all posts

31.10.13

PHOTOSHOP for beginners : ACTIONS

Here is the start of a new series on PHOTOSHOP, which btw, I simply adore! It can be confusing at first, but with practice can become quite easy! I am no pro, but here is a post on how I  take my photos one step further.

The photo below is from a shoot where I let my friend borrow my camera. I forgot to tell her to check the settings. Turns out it was on florescent lighting. Haha, which makes sense seeing how blue the photo is. 

To apply some actions to fix and make it pop, check out this video tutorial on how to download and use actions. The actions I used on the photo below were OSE's Sweet Sunset Action, and Alex Beadon's Rose. I also added some sepia tones. What do you think? xo


10.7.13

D.I.Y. FASHION MAKEOVER | DENIM JEAN DRESS TO TOP


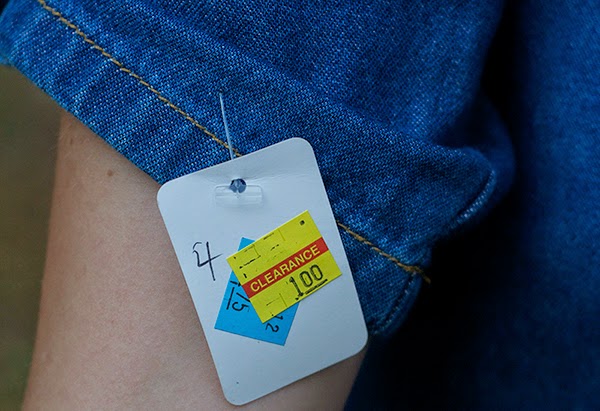
This dress is very ugly. I found it at a second-hand store for a buck. Looking at it closely though, there are a few possibilities. Chop off the skirt and sleeves and you have a denim vest. Or a few changes and you have a denim top that is totally in trend right now! I decided to go for the latter idea, which turned out to be very fun! I'm thinking of bleaching it sometime so it's a lighter denim, but anyways here we go...

FROM TACKY, TO TRENDY!

Directions: I cut off the skirt to the length I desired, making the cut slightly curved on the sides. I rolled the hem under twice, pinning as I went. After finding some gold thread that matched the other threading, I sewed a straight stitch until I had sewn the whole hemline. You can repeat another line so it is double stitched. Very easy project, with huge results!


xo STEPHANIE

3.7.13

D.I.Y. PAINTED SHOES MAKEOVER


Whether you have a pair of sneakers that have been worn down on the outside, a color that is so not cute, or if you are bored with your shoe collection, then this d.i.y. project will be perfect for you to try! I am in love with the color mint right now, so I decided to makeover a pair of yellow shoes that I never wear.


You'll need any pair of shoes you want to use

Fabric paint is inexpensive and easy to find in your local craft store. You'll also need a medium size paintbrush. The color mint is easy to mix using the colors above. Remove shoelaces and paint at your lea sure. Let dry completely. I can't wait to do this again with another color!


1.7.13

D.I.Y. OWL ANIMAL PILLOW TOY


Inspired by an Anthropolgie owl, I wanted to make something like it for my niece to play with! Isn't this just the cutest thing? I already had all the materials, there's not much you need to make it! So let's get started.


MATERIALS
 -Fake fur or fuzzy material is best for the stomach, back, and wings.
-Felt for the eyes.
-Grey material for head
-Cute patterned material for feet
-Stuffing

 
Cut out pattern pieces, adding 1/2" for seam allowance. (note: make sure to pre wash/dry your fabrics) Using black thread and a needle, embroider dots for the pupils on the eyeball pieces. Machine-stitch both of the eye pieces on top of the front head piece. Next, machine-stitch around each of the feet, wings, head, and body pieces, (all inside out) leaving a small opening for turning it out. Stuff the inside of the owl, making sure to put enough to make it nice and squishy. Then you can hand stitch the openings closed, and sew on the beak, and wings.

Leave comments with any questions you might have!

me and my niece / she loves her owl :)

25.6.13

D.I.Y. PROJECT : FLORAL SHORTS


SUPPLIES: 
any shorts/pants, fabric paints, stencils, stenciling brushes

floral shorts

THESE FLORAL SHORTS ARE GREAT BECAUSE THEY WILL FIT IN ANYONE'S BUDGET. THEY ARE ALSO THE CUTEST THING! 

1. Using some old jeans, I carefully cut off the legs to the length I wanted. It's alright if some ends hang down, or you can also roll them up if it bothers you. You can also use any plain shorts that you have on hand. The point of this d.i.y. is to not have to buy any shorts for the project :) or you might as well go buy the floral shorts for sale! 2. I mixed white paint with the green paint for the mint colored leaves, and white and hot pink paint for a light pink which looked awesome for the rose color. 3. Using your stencil brush, lightly paint the roses and leaves in a random design over the denim. Let dry.

Tips: 
-Try not to paint it on too thick.
-It's best to paint one side and let it dry completely before painting the other.
-The entire process of stenciling the shorts took me a couple hours so pick out a show or movie to watch while you have fun painting!


  HOPE YOU LIKED THIS TUTORIAL. KEEP COMING BACK FOR MORE D.I.Y! -Stephanie


29.4.13

D.I.Y. | FLORAL HAIR CROWN


Quite easy to make, and so in trend this summer, floral crowns add a little bit of girlish innocence to an outfit. After seeing a ton of these crowns on pinterest and for sale on urban outfitters/free people, I bought a whole bunch of different artificial silk roses at the dollar store to make my own! I already had the other supplies like green floral arranging tape, wire, clippers, hot glue gun, and scissors. This project took me about an hour.

1// snip wire to the right length to fit around your head (twist 1 inch extra ends together) 2// wrap around the circle of wire with the green floral tape 3// cut ends off of flower buds and using the hot glue gun, start arranging and attaching blooms onto crown.

Tada! Hope you love your crown! -Stephanie

10.4.13

BEAUTY SERIES | How To Apply Eyeshadow


I've found eyeshadow to be a necessary part of my make up routine everyday. I feel like it helps so much in enhancing my eye shape and color. There is a lot of different things to keep in mind, such as what eyeshadow shades are best for different eye colors, what brushes to use when applying, and how to do different looks, and some random tips I've learned over the years.

source unknown

Let's talk what colors to use

It is best to stick to the eyeshadow shades that compliment your skin tone and eye shade, and remember the time of day you are shopping for and the venue you will be at will greatly influence your eyeshadow color choice. 

Day Time: It is best to target the lighter and neutral shades.

Evening: This is the time suited for experimenting as you can typically get away with stronger shades and bolder colors.

I have brown eyes, and what's nice is that brown eyes can get away with wearing almost any color of eyeshadow. If you want to really make them pop then try either green eyeshadow or pink eyeshadow. With brown eyes, you can also use blue/purple eyeshadow, and if you have gold flecks in your eyes you may want to try an eyeshadow that has a gold shimmer to it. Brown eyes can even pull-off wearing brown eyeshadow, but be careful because certain tones can look muddy against your beautiful brown eyes.

If you have blue eyes, you'll want to go after golden browns, browns with a slight purple base, taupe, and slate colored grays. Have some fun with it. Try a nice rose colored eyeshadow. The coolness from the pink/purple eyeshadow will be a really nice contrast to your blue eyes. 

For you green eyed girls, go after those purple shades that will really make them pop! If you want your eyes to stand out but look more natural, you may want to try warmer mocha brown shades or warm colors with slight orange undertones. Basic eyeshadow colors for green eyes would be earth tones with slight hints of gold, taupe colors, mocha browns, and lavender-purple shades. Since most green and hazel eyes has a variety of flecks, feel free to experiment with these colors so you can find the perfect one for your eyes.

The most important thing here is, don't overdue it. Less is more. Blending is key. 

Eyeshadow now comes in many styles and finishes. It is available in creams, powders, liquid and pencils. There's so much out there, that I would just try out different things and see what works best for you.
It can be frosted; matte, glitter, shimmer and some are specifically designed for drier or older skin. Many manufactures now produce eyeshadow compacts with coordinated shades of eyeshadow, typically including a light, medium and dark shade. 

The ever-changing trends and fashion statements have lead us to see a rise in the use of intense eyeshadow colors. Experimenting with these intense colors on your eyes can be fun. You can test eye shadow colors on the back of your hand or your inner wrist. I've realized though, that while you can grab inspiration from runway or fashion trends, sometimes it's just not meant to be worn for normal day. 

Eyeshadow application will vary greatly from person to person due to eye shape, skin types and the effect you are after, although there are a few principle points on applying eyeshadow. Light shades will generally open and highlight the eyes, giving the eyes a larger look. Dark shades will add depth and dimension, while making the eyes look smaller

To start you should grab the following items of make up

Eyeshadow (light, medium, and dark shades that suit your complexion and eye color)
Makeup Brushes (E.L.F. or SIGMA has some amazing brushes that will do a great job in blending!)
Eyeliner
Mascara
Makeup remover

It is best if you start this process as you would with your normal makeup application, by applying your usual foundation and face powder.


Begin by applying a light color from lash line to brows. Shades of ivory, beige, peach or pink are common, but other light tones can work well. Then apply a medium shade from lash line to crease. Finally, accent the crease of the eyelid with the darkest shade. Blend with a soft brush to avoid removing your eye shadow or smudging. You can apply eyeliner along the lash line and use mascara to accent your eye lashes if you like. Eye makeup remover or a damp cloth can remove smudges. Some people opt to do their eye shadow and other eye makeup before applying foundation and other makeup to allow mistakes to be tidied up more easily.

And ta da! You've now learned the basics of applying eyeshadow! If you want more technical or labor intensive (haha!) tutorials, check out youtube. There are thousands of videos there to help you out.

19.2.13

d.i.y

Hi everyone,
this is a fast and easy project. if you click on the picture, it will get bigger. 

i can't seem to stop making bows out of every color and fabric! enjoy making your own loveliness :-)


18.12.12

D.I.Y. GIFT WRAP


This season is so busy and yet we want to make each gift we wrap special and adorable. This way takes about 3 minutes and yet looks all put together!

MATERIALS: wrapping paper, embroidery thread, thick tan paper (this is for the tags. I cut them in circles and punched a hole), stamp + ink pad, pen, scissors, tape

INSTRUCTIONS: 1. Wrap your present. 2. Stamp a word, greeting, or design onto the tag. 3. Cut your thread about double the length of the present. 4. insert thread ends through tag and wrap around to the back and tie a knot (cut loose ends). 5. I wrote on the back of the tag who it was to and from.

And that's it! :D Hope you all are having a merry Christmas!

LinkWithin

Related Posts Plugin for WordPress, Blogger...